Thursday, January 31, 2013

Weaving (the elephant in the room--literally)

It's a bit embarrassing that I haven't posted these yet, as these projects have been dangling from the walls for quite awhile now. They've even been featured on our school news channel. But not on this blog--fail.

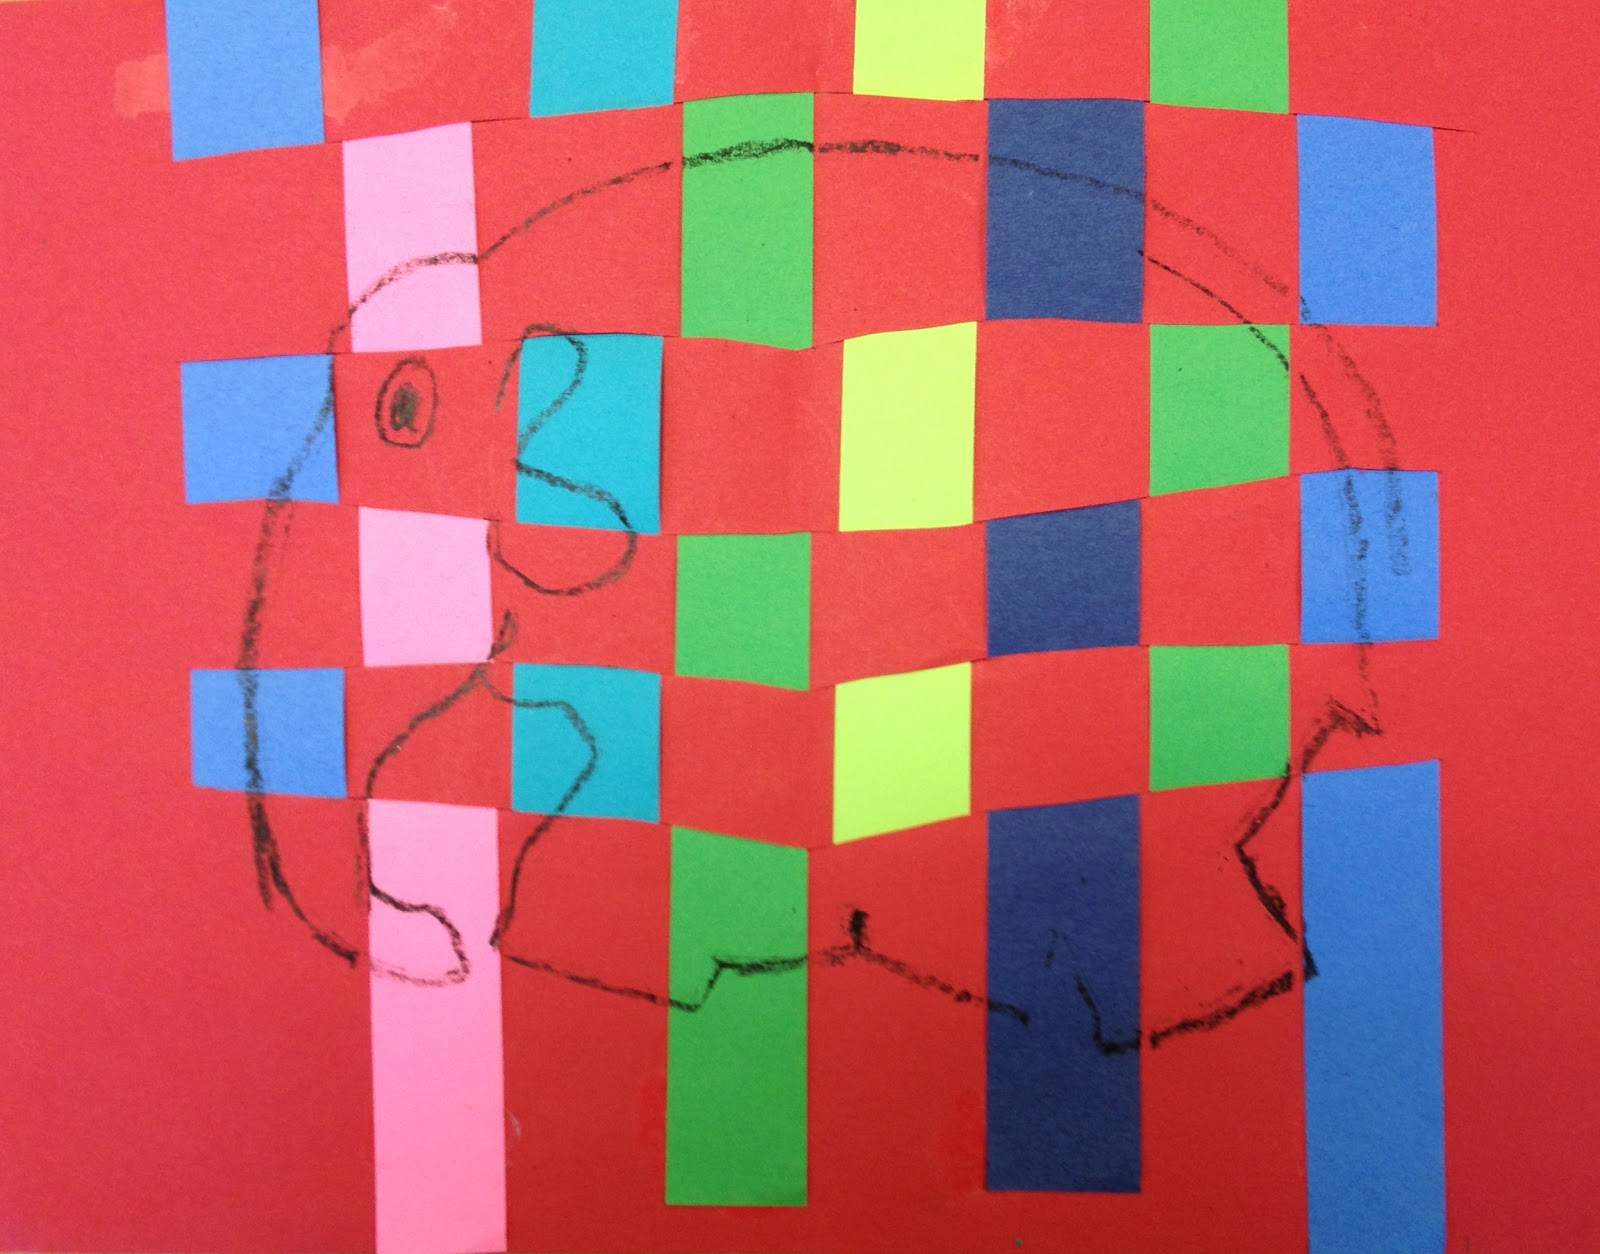
Once upon a time, my first graders made colorful 9x12" weavings on which they traced the shape of an elephant, a la Elmer the Patchwork Elephant. (I saw the Elmer idea on Pinterest, from here.)

We went through a whole spiel to fold, draw, and cut the proper lines on the 9x12" paper to get the warp.

Then the over/under games began!


For some unknown reason, I kept referring to their strips of paper as 'chicken strips' all throughout this project. Then I got really hungry and one Friday night sent my husband to the grocery store for chicken strips. I felt better after that.


The kiddos traced Elmer patterns that I made but had to add the eye and ear on their own. I adore the individual results--from eyelashes to bug eyes, floppy ears to teeny tiny people ears!


The kiddos loved their Elmers and I was pleased with this quickie result. I have a weaving phobia, people. I don't know where it came from, and I imagine that the cure might be just doing it for cryin' outloud, but alas, here we are. I have yet to pull out the surplus of yarn that lurks in the boxes stacked atop my cabinets (maybe because the janitor once found a bat living up there? eeek!), and show my darlings the (supposed) joy of the loom. I suppose I could blame the curriculum--beyond paper weaving with the little kiddos, it's not a requirement. Adding a pachyderm into the weaving equation makes this much more interesting, if you ask me.

So go ahead and judge my lack of bravery on the yarn weaving end of things. Maybe a little judgment is what I need to get my bootie into gear! And now, two questions for you:

1. When weaving with paper, do you pre-cut your warp (or 'looms') for the kiddos, or have them do it themselves?

2. Second, do you allow students to glue down their imperfections or prefer to try to fix all wrong turns? 'Cause I'm undecided--sometimes I act as the paper weaving police, while other times I enjoy the quirkiness of a misplaced paper strip.

Monday, January 28, 2013

Prepping for a student teacher

Today I'm blogging from home, as we are enjoying a snow day! Despite throwing off my plans and stealing away a day of Easter break, I am not opposed to snow days that make for long weekends!

As I cuddle with the pup and maintain an all-pajama wardrobe, I'm trying to prep for a student teacher. This will be my second ST. My first was just last Spring and it was, overall, a good experience. I really had to think and pray about having a student teacher, and while I know it isn't for everyone, I came to the personal conclusion that it was something I needed to do. I think I'll expand on that in another post.

For today, as I reflect on my first experience and prepare for my second, I'd like to ask for any tips or advice (or anecdotes!) from those of you who have had STs in the past. How did you get ready? Why did you agree to take a ST? How did it go? Would you do it again? If so, would you do anything differently?

And for anyone fresh off of a student teaching experience, what made your experience great (or not so great)? What were the most valuable lessons you learned? What do you wish you had learned or experienced but didn't get to?

Rudy's first snow day--which has nothing to do with student teachers, but gosh, he's cute.

Saturday, January 26, 2013

Turtle power!

Following their exploration of all things Elmer, my first graders are continuing their study of pattern, using another animal as their inspiration. Turtle power, baby!

Do your kids insist that linear patterns are the only true patterns? So often, if my kids can't list it in a neat little row, they don't think it qualifies as a pattern. For instance, if they can say it in a clear order (red, white, blue, red, white, blue, red, white, blue), they're good; but when I show patterns like this:


... they get all bent outta shape. This project seems to help them understand pattern (as repetition) a bit better. We discuss what pattern is and locate examples throughout the room before moving onto animal patterns. Animal patterns like giraffe, zebra, and cheetah patterns really help them to see what constitutes a pattern, regardless of finite regularity.

I do let my little ones use black Sharpies for this (I <3 black Sharpies) to avoid smudging their turtle bodies. Here's what we do:

Draw an oval that almost fills the paper. Give that oval a triangular tail on one end and a head on the other. Your head needs a face!


How many legs does a turtle have? No, not 6, silly kid in the back. Yes, 4. Draw 'em.

Next, 2 vertical lines and 3 horizontal lines finish Mr. (or Mrs. or Ms. or Miss) Turtle's shell. Now put away those Sharpies--you're makin' me nervous, tiny children.


Fill every space with a different pattern, pressing firmly with those construction paper crayons. Leave white space--we need it for next time!


On the second day of our project, we cut out the turtles and paint them. I opted to use liquid watercolors for this project and I'm thrilled with the bright, bold results!


Such concentration!

As the kiddos finish their painting, I have them create a pattern around the edge of a black sheet of paper. This year I used 12" square paper, though in the past I've done the backgrounds in a variety of ways.


This year, emphasizing the quilt aspect of this project, I'm going to hang all of the black squares in a quilt-like pattern. (We talk about quilts beforehand.)

My memory fails me again, as I don't know where I found the original inspiration for this project. If this was your brainchild and you'd like to lay claim, let me know and I'll sing your praises!

Thursday, January 24, 2013

Tasty Thiebauds


 One of my favorite parts of teaching is that I get to learn along with the kids. I first came upon a lesson about Wayne Thiebaud's bold oil paintings of cakes and pies a few years ago, and it remains one of my favorite projects each year. And Thiebaud is alive and well, and still painting (as far as I know)!

http://www.nga.gov/education/classroom/counting_on_art/act_fractions.shtm

I love this guy. Interviews with him are so inspiring and his work never gets old. My kids love this project and gobble up all the learning that goes with the making.

We spend the first part of our initial class talking about Thiebaud (and touching on Pop Art, especially since Andy Warhol is a former resident of semi-nearby Pittsburgh, PA, where I did my student teaching). The kids take the rest of class to sketch, focusing on proper cylinder formation, with those tricky ellipses forming the curvature of the cakes.


On the second day, students transfer their sketches onto 12 x 18" black paper. They have the option to create a tiered cake or take out a slice, though both are optional.


Then comes the coloring, which typically takes us 2 full 45-minute classes to complete. We use oil pastels, which totally rock on the black paper!


This cake is movie theater-themed!

At the end of the project, I do some shading and shadowing demos and let the kids do their own thing. I'll post the finished products soon!

It's not a one-of-a-kind project, but I think that putting it on black paper helps to make the cakes stand out. At the start, my fifth graders always question using black paper, but always end up loving it--it's like I know what I'm doing or something. ;-)

If you don't know much about Thiebaud, some resources I've used include:
CBS Sunday MorningThiebaud - a great video to show the kids, though I do have to black out the part where Thiebaud is speaking in front of the painting of a nude couple!
KQED Spark - another interesting video
Smithsonian.com - chastising me for associating Thiebaud for Pop Art, ha
The National Gallery of Art Classroom

UPDATE: Check out some of our finished products here!

Tuesday, January 22, 2013

Chinese New Year Dragon Puppets

This is, by far, one of the top three most asked-about projects by my students. Even my first graders beg me for this project, and they don't do it till fourth grade! These are Chinese Dragon Puppets. And they are really, really exciting, people--any 10-year-old in Dillsburg will tell ya. When I announce the start of these project, the children burst into applause and cheer!


Don't let this unimpressive picture fool you--this is a fab project.

I show the kiddos pictures of the Chinese New Year celebrations in China and some of the Chinatowns across the United States. The "oooo's" and "ahhh's" that these pictures get is so good for the ego, let me tell you what. It's like you are teaching them THE MOST WONDERFUL THING THAT THEY'VE EVER LEARNED! Go on and brush your shoulders off!

I have head and tail templates that I made up for everyone to use. Everyone must draw their head and tail twice, facing opposite directions. That's probably the hardest part of the whole project. Oy.


 Then comes the designing...


... and the coloring. I have learned to put strict limits on the amount of time I allow the kids to plan out and design their dragons. Same goes for coloring--I have to push them every moment of every class to get them going (while staying neat). If I don't, the dragons end up being a love affair that lasts far too long. Too much of a good thing, ya know?


Next, we cut 'em out and subsequently assemble our pieces. We're not there yet. I'll post again when that happens, hopefully before the Chinese New Year, which is celebrated on February 10th of this year. Get me a fortune cookie!

Also, I do not recall my original source of inspiration for this project. I think I had accidentally stumbled upon this in some corner of the Internet some years ago. If you invented the original project that led to our dragons, then please let me know so I can give you credit. Also, may God bless you many times over--you have made me so very cool amongst fourth graders. And isn't that what life is all about?